How to Setup a Canon Printer: 3 Easy-to-Follow Steps
Have you got a new Canon printer? Let’s learn how to setup a Canon printer to make the most out of it. Setting up a new printer can be a challenging task in the beginning. But once you have done it, it will be great the next time you take it to the printer.
As a printer expert, I have performed
such tasks several times. I still receive many calls from my customers, and I
guide them through the easy steps to troubleshoot their issues. Anyone can
setup their Canon printer; you don’t need to be tech-savvy when you follow a
detailed blog like this one.
This blog will explain how to setup the
printer in 3 steps. These instructions include preparing the Canon printer and
installing the print head and ink tanks. Let’s get started now.
Step 1: Preparing Your Canon Printer
- Find a flat surface, such as a table, and place the printer on it
horizontally. Make sure there is no object in front of the printer.
- After that,
you need to open the Back Tray and extend the Paper Support.
- Then, you have to open the Front
Tray and extend the Output Tray Extension.

Note: Before you turn on the
printer, be sure to remove all the tapes from it.
- Now, insert the power cable into the
printer and the other end to the wall outlet.

- Next, hit the power
button to switch on your printer.
- Also, open the Top Cover (A), and you will see the
print head holder slides in the middle of the printer.

Now, we have completed the process of how to setup a Canon printer. Next, we
need to proceed to the next step, where we will learn how to insert a print
head.
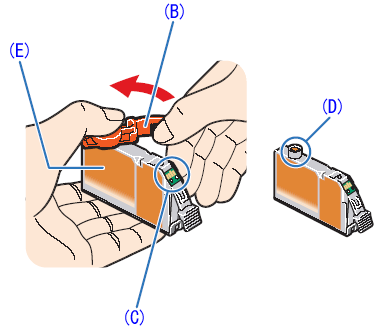
Step 2: Inserting the Print Head
- First, you must unpack the print head from
this package.

- Then, you need to take out the orange
protective cap (A) from the print head and throw it away.

Note: Please do not touch the Print Head Nozzles (B) and other electrical
contacts.
- Next, you have to lift the Print Head Lock Lever gently until
it stops. Here, you may feel the lock level is a bit heavy.

- Now, install the print head. Ensure
you do not touch the encircled (D) area.

- You have to push the print head to secure it.
- After the print head is properly placed, you have to
lock the lever carefully.
Step 3: Installing Ink Tanks
- First, grab the ink tank and remove the
orange tape (See the direction of the arrow) to peel off the protective
layer completely.

- Once done, you need to throw the
orange protective cap (B), which is located at the bottom of your ink
tank.
Important
Notes: Do not touch any electrical components (C) or
port (D). Also, do not press (E).
- Then, find the right-hand slot in your printer and
install the ink tank.
- Afterward, hit the push mark on your ink tank until you
hear a clicking sound.
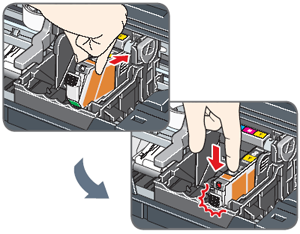
- Next, ensure the ink lamps are lighting the red in
color.
- Insert
the ink tanks from right to left in this order: Black, Cyan, Magenta, and
Yellow.
- Finally, close the top lid of the printer.
Important
Note: After you start the printer, it will take a few
minutes for it to stop making noise and become ready to print, especially
during the first and second time after setup, which may take 1-2 minutes.
Finally, I have explained how to setup a Canon printer in 3
simple steps. Now, print your documents hassle-free.
FAQs
Question 1: How
to setup Canon printer to WiFi?
Answer:
Setting up a printer to WiFi is a cakewalk. Here is
how you can setup using your WiFi:
- First, turn on the printer.
- After that,
navigate to the Setup menu
option.
- Then, you
need to select Wireless LAN Setup.
- Next, choose
any wireless router/access point from the list.
- Also, you
have to input the password.
- As a result,
a blue light will flash when the printer is connected to WiFi.
- When the
light becomes solid blue, your printer is connected.
- Finally, install the printer driver on your device.
Question 2: How
do I setup Canon printer?
Answer:
If you want to connect your printer in a simplified
manner, you must understand the following steps. By following the steps below,
you can setup your printer easily. Here is how to setup your printer:
- Prepare
printer - Place your printer on a flat surface and turn it on.
- Connect
printer - Connect your printer via WiFi and add it to your device.
- Install the
printer driver - Navigate to Canon’s site to download the driver.
- Test print -
Once setup is done, you must test print to confirm its setup correctly.
Question 3: Do I
need a driver to setup my Canon printer?
Answer:
Yes, a printer driver is a must to setup your Canon
printer. The printer driver is like an intermediary between your computer and
the printer. It translates instructions from the computer to the printer in its
language. You can download & install the driver with a CD or the official
Canon site.
Conclusion
In this blog, I have discussed the most important topic, which is how to setup a Canon printer in three steps. The first step was about preparing the printer, like opening the lids. In the second step, we saw how to install or place the print head into the printer. In the last step, I showed how to install the ink tank into the printer. These steps are a must and must be performed carefully.
Read more: ij.start.canon


The Canon PIXMA G6020 is an excellent choice for anyone seeking a versatile, high-performance printer. Its refillable ink tank system is a game-changer, offering incredible cost savings and high page yields. Whether for home or office use, the G6020 delivers exceptional print quality and functionality. Truly a smart investment for those who value quality and efficiency in printing
ReplyDelete